Pages

Friday, January 30, 2015

Secrets and how hard it is to keep them!


Oh, how I am dying to share my new English paper piecing mystery block of the month with all of you!!! Each time I finished designing a block, I proclaimed it to be my favorite only to have the next design become my new favorite. 

Are you like that too? Whatever you are working on at that particular moment is your all-time favorite? Between embroidering hats for customers and this block of the month, it's taken up nearly all of my time, but I've been having a blast.

The first class is tomorrow and I'm ready to get this project into the hands of willing participants. I promise to take photos as the year progresses. It will be fun to see all of the color variations for each block. The class is at Pioneer Quilts. I hope to see you there tomorrow!

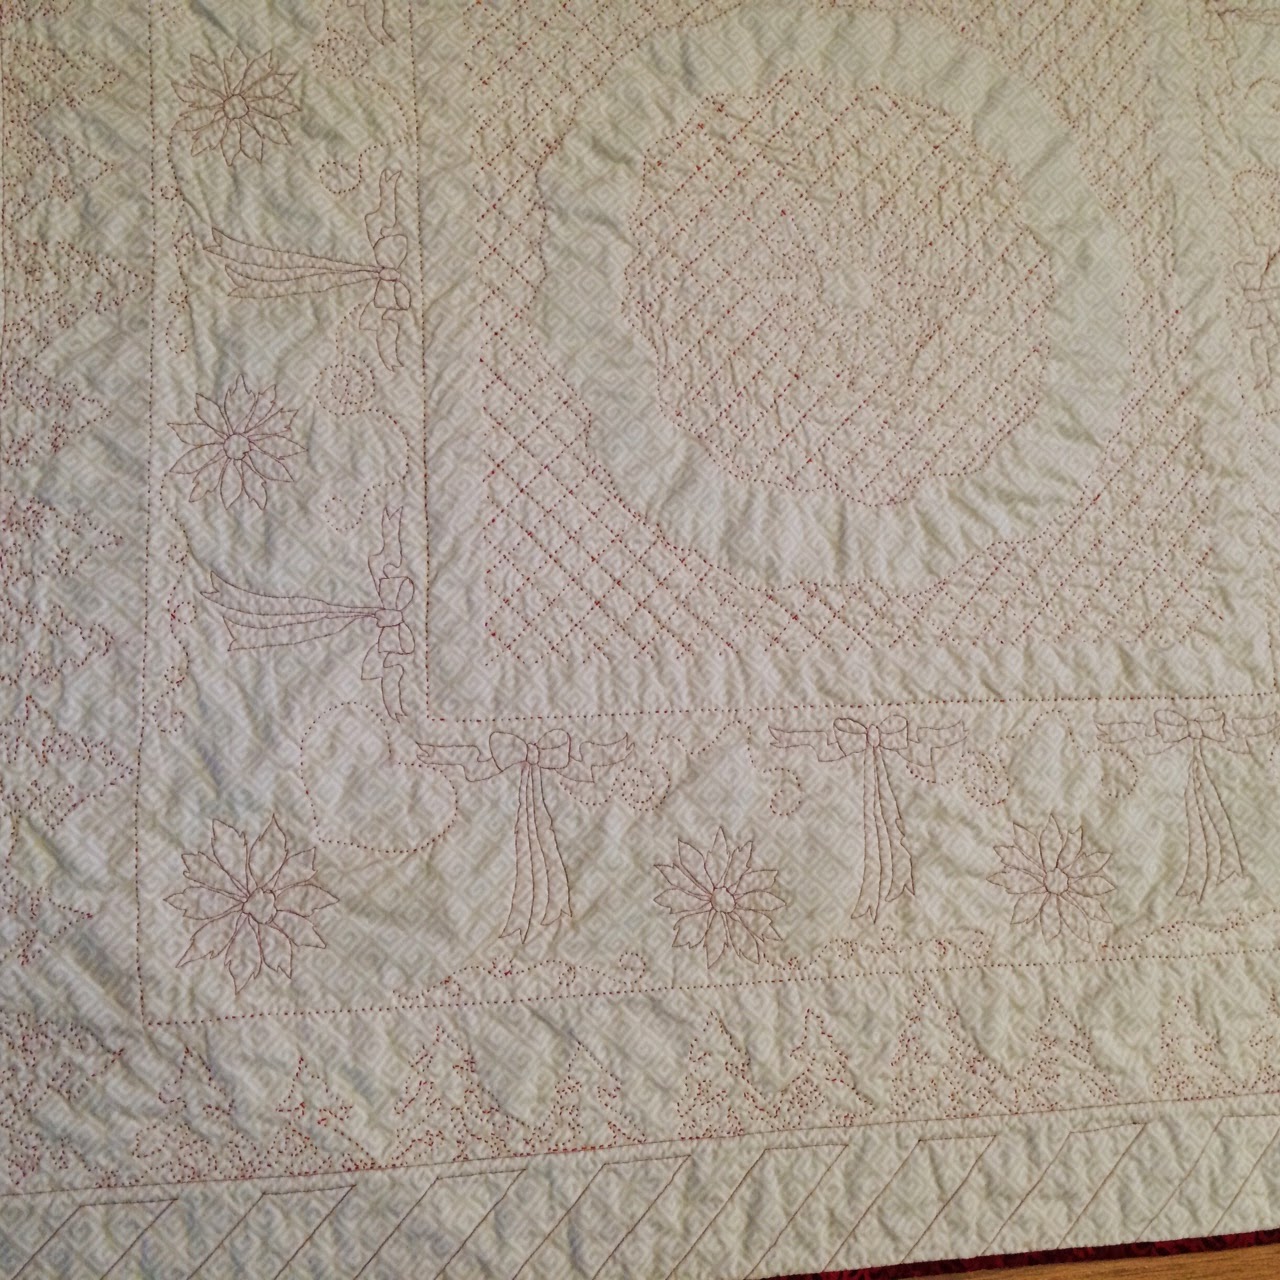
The pictures below are of one of my ongoing projects. The quilt is a rendition of Sue Garman's Ruffled Roses that she created in 2011 for The Quilt Show. I redesigned the center block, swag borders, and corner blocks to make it fit my Christmas theme. Sue is one of my top 10 quilt designers because of her attention to detail. Her instructions are meticulous, and she is someone I dream of meeting in person one day.

Each year I proclaim that this IS THE YEAR for me to finish it. LOL Someday...someday....

And here a a couple of actions shots!  

I am working on the last four baskets and then I can join them to the center. There will be one border left after I get these joined. I could almost squeal at the thought of seeing it at the next stage.
Note to all meat eaters -- don't forget to check back in in a few days for Monday's Recipe. You won't be disappointed!


Monday, January 26, 2015

Recipe Monday -- Lick the bowl clean Onion Soup

I warned you beforehand that soup is a favorite of mine!  This is a killer, warm-me-up, soothing, soup that will have you sneaking back in for just one more bite. Try it....you'll see that I'm not kidding.

Lick the bowl clean Onion Soup

(Note: the flavors are at their best the next day so if you can stand the wait, make it one day ahead of when you plan to enjoy it.)

Ingredients:
  • 4 Tablespoons butter
  • 1 teaspoon salt
  • 2 large red onions, thinly sliced
  • 2 large white onions, thinly sliced
  • 1 large Walla Walla onion, thinly sliced
  • 2 (14 oz) cans beef broth
  • ½ cup Merlot (I used Two Vines brand, Columbia Crest 2009 made in Washington State less than $6)
  • 1 Tablespoon Worcestershire sauce 
  • 2 sprigs fresh parsley (I used dried and about 1 T)
  • 1 sprig fresh thyme leaves (I used dried)
  • 1 bay leaf
  • 1 Tablespoon balsamic vinegar (don’t skip this—keeps red onions from turning soup odd color)
  • Salt and freshly ground black pepper to taste (I didn’t need any additional salt)

Directions:
  1. Melt butter in a large pot over medium-high heat. Stir in salt and all thinly sliced onions. Cook 35 minutes, stirring frequently (to avoid browning the onions, I stirred almost constantly), until onions are caramelized and almost syrupy (I turned up the heat and kept stirring to get to this last stage of the cooking).
  2. Mix beef broth, Merlot, and Worcestershire sauce into pot. Bundle the parsley, thyme, and bay leaf with twine and place in pot (I put mine in cheesecloth and tied with twine). 
  3. Simmer over medium heat for 20 minutes, stirring occasionally. 
  4. Remove and discard the herbs. 
  5. Reduce the heat to low, mix in balsamic vinegar and season with pepper and if needed – salt (again, I did not add additional salt). 
  6. Cover and keep over low heat to stay hot until ready to eat.
The following directions below are completely OPTIONAL. We always skip it and really don't miss it at all, but if you want to super-indulge -- go for it!

Ingredients:
  • 4 thick slices of thick bread cut in chunky strips and toasted under broiler
  • 8 slices of Swiss cheese, room temperature
  • ½ cup Asiago or mozzarella cheese, room temperature

Directions:
  1. Arrange hot soup in oven safe bowls or crocks on a rimmed baking sheet. 
  2. Fill each bowl 2/3 full with hot soup. 
  3. Top each bowl with several strips of toasted bread, slice or two of Swiss cheese and a handful of Asiago or mozzarella cheese.
  4. Broil 5 minutes or until bubbly and golden brown (WATCH closely so cheese doesn't burn).
Bon Appetite.

Saturday, January 24, 2015

Grow Your Blog


Hello and welcome to my blog. This is my first year of being a participant at 2 Bags Full's Grow Your Blog. Vicki is the owner of 2 Bags Full and is the coordinator of this wonderful event.

Thank you Vicki for doing all this work. I look forward to meeting new people and their blogs during this event.

My blog name is my actual name -- jojo hall. I adore all things fiber related and my hands are always in motion. I own a commercial embroidery business and teach digitizing, back-office production, and quilting. There is more about me on my About page above.

I started blogging on blogger after losing many, many years of my blog that was on a different site. It was heartbreaking to lose all of that history because it was sort of like a diary to me. I know they are working on recapturing what was lost, but I decided to start blogging on my own so I have more control of the blog.

Every Monday, I post a recipe of some of my favorite things. Other days are more hit and miss and are open to whatever I'm working on at the time (embroidery, sewing, quilting or in the summer -- gardening!). My goal is to post three times a week.

I hope to always have something entertaining for you to read whenever you decide to visit me again.


Monday, January 19, 2015

Recipe Monday - Bean with Bacon Soup

I admit loving soups, any soup. So much so, that I think I could eat some type of soup every day of the week and still never tire of it. There are so many ways of varying soups that the sky is really the limit when it comes to changing up a recipe.

My mother’s go to soup when I was young was vegetable soup, and boy did she make great vegetable soup. The only thing that made it even better was when we had run out of okra from the garden. We had a huge garden every summer and our garden bounty was lovingly canned or frozen to enjoy throughout the winter months. There are very few vegetables that I don’t like. Okra is at the top of my list of icky veggies. It makes me grimace just typing the word Okra! Since both of my parents worked outside the home, there were some dinners that included soup from a can….Campbell’s soup. We would each get to pick the soup we wanted, and my favorite was Bean with Bacon soup. I don’t recall actually seeing bacon in it, but I sure did love the taste.

Fast forward some 40 years and I still love Bean with Bacon soup. However, I do not eat soups from a can anymore because I like controlling what is in my soups and I love the process of cooking with my hands. Most soups can be made ahead on the weekends and enjoyed the following week and some are great to freeze for those evenings when no one feels like cooking. Some soups are quite fast at making and others do better low and slow.

This soup falls under the low and slow method and should be made when you have at least a half a day to stay inside and sew or just enjoy relaxing. There is not a lot of babysitting involved once you get it cooking so you can do other things while occasionally popping in to check on your soup. The bonus is your home will radiate the most wonderful smell of down-home comfort food. If you have a visitor, don’t be surprised if he/she wants to stay for dinner. It smells just that good! You could try making it in a crock pot, but the beauty of this soup is the cooking down of it which makes it thick and creamy. The nature of a crock pot is to hold in all of the liquid so you won't get the same results if you use it.

I’m going to include two ways of making this soup so you get to decide just how much time you have to devote to it. With the first method, you use dry beans that you have soaked overnight and in the second method you use canned beans from a can. I’ll start with the pre-soaked dry beans and add in the second method at the end under notes.

Note that I do not include any additional salt in the recipe below. The bacon, chicken stock and tomato sauce adds in more than enough. You also get to control how much bacon you use. I usually add at least 1/2 pound but have done as much as 1 pound when I wanted to get a bite of bacon in every bite!

Below the directions are some step by step pictures for those like me who like to see progress photos!

Bean with Bacon Soup

Ingredients:
  • 1 pound of dried great northern beans, washed
  • 1/2 to 1 pound bacon (diced) 
  • 1 cup diced onion
  • 3 T (mild) fire roasted diced green chiles
  • 1 cup of diced carrots
  • 32 ounces  reduced sodium chicken stock
  • 2 cups water
  • 6 to 8 ounces tomato sauce
  • 1/2 tsp garlic powder
  • 2 T fresh cilantro, finely chopped
  • Ground black pepper to taste
Directions:
  1. Rinse and sort beans and put in large bowl or pot. Add enough water to cover beans by 2 to 3 inches.
  2. Allow beans to stand overnight. In the morning, drain and rinse beans and place in large pot. Add 2 cups of water and chicken stock.
  3. Bring beans to a boil and then reduce heat to simmer and simmer gently with lid tilted for 2 hours or until bean are tender.
  4. Remove about 1/2 of cooked beans and mash by hand or in blender. Stir mashed beans back to pot.
  5. Place the diced bacon in a pan and cook while continually stirring over medium-high heat until browned, about 10 minutes. (Be watchful that the bacon does not burn. I generally remove bacon from the pan right before it looks completely done because it will continue to cook and crisp up.)
  6. Remove bacon bits from pan and drain on paper towel.
  7. Remove all but 1 T of bacon grease from pan. Add in onion and carrots to pan and cook until softened. Add in chiles and cook for 2 minutes longer.
  8. Stir in the onion/carrot/chiles mixture to beans. 
  9. Stir in tomato sauce, garlic powder, pepper, and drained bacon bits. Stir beans well to incorporate all ingredients. [Note: if mixture looks a bit too thick at this point, you can add in a can of chicken stock or water and continue to step 10.]
  10. Remove lid from pot, increase heat to medium until it starts to really bubble and then reduce heat to low and cook down for approximately 1 hour. Don't forget to occasionally stir beans during this stage to avoid sticking to the bottom of the pot. 
NOTES: If you want to shorten the cook time, you can use canned beans. I have used 4 cans of S&W White Beans (50% less sodium). Open cans and put bean in colander and rinse well. Add half of the beans to the pot and mash the other half. Add mashed beans to pot and continue at step 5 above.

Bon Appetit!

I prefer to allow my beans to soak overnight. In the picture below is how much the beans expanded overnight while left in the water. Make sure to add enough water the night before.
This next picture show about half the beans after they have been blended in my Vitamix machine. You can't see it but there are still some small chunks in there.
 Bacon cooking in pan. It looks like it is not quite done yet, doesn't it?
 After draining for 15 minutes, the bacon is perfect...not too hard and not too soggy.
 Carrots, chilis, and onions sweating in just a tiny bit of bacon grease.
 2 T of chopped cilantro.
Everything mixed in and the start of cooking. It looks a little too red doesn't it? You may think at this point that you added too much tomato sauce but you didn't....don't worry.
This next picture shows how much I cooked it down. I would say it's been reduced 1-1/2 to 2 inches from where it started. Now look at the color?  Deep, rich, thick, yummy soup just begging for you to sample! Hey, you were the cook -- you deserve first taste.
Friday, January 16, 2015

Moment of play


Do you recognize this block? I know the colors are outlandish, but they were the first scraps I grabbed. I found a line drawing of it in a book called Patchwork Patterns by Jinny Beyer. It's called Dutchman's Puzzle. I love how Jinny breaks down blocks so we can understand how the blocks are put together. In her book, this book is called a 16 patch because it was made with half square triangles. My version is done up with flying geese units. Eight flying geese make up this block.
I'm anticipating teaching more and more classes this year so I purchased the Go BIG. It arrived this week but I haven't had an opportunity to work with it due to a root canal gone bad procedure. The BIG came with a die and mat, which is unusual for AccuQuilt. At first, I wasn't wowed by the die. If you've known me for very long, you know that I like working with 'small' pieces and these geese are HUGE. The geese finish at 3" by 6." Man oh, those geese had way to much cake for Christmas! 

In order to try out the new electric cutter, I grabbed scrap fabrics so I could make the first non-manual cut!  Wow...it was simply fantastic...  Ruh roe as Scooby Doo would say...cause I couldn't stop with just the cut you see below. I had to cut more....just to make sure it is working properly.
And then I had to sew it together to see if it was accurate!  Easy...peasy cutting and sewing! I'm pretty sure you could cut and sew a quilt in a day using the Big and this die.  

I think the big geese are growing on me and the BIG Accuquilt is awesome!


Wednesday, January 14, 2015

Insatiable Insanity

If someone would have told me that I would become a bit of a fanatic with playing with six-sided shapes lovingly called hexagons a few years ago, I would have laughed out loud loudly. It started out innocently enough. I picked up a package of 1/4" pre-cut hexagon shapes at my local quilting shop. They were just too cute to pass up on, and of course, no one told me that 1/4" shapes are probably not the best size to use at first.  The local guild I belong to (Clark County Quilters in Vancouver, Washington) was having a red/white theme for the year, and I thought it might be fun to enter. I had never entered a quilt into anything before so that intrigued me. I figured the 1/4" hexagons would be perfect because it would be fun and it would be fast because it would be a miniature. By now you are most likely shaking your head too because it was not fast in any sense of the word, but boy was it fun.

I made up the tiny hexagons by the baggy full with no direction of what I was going to do with them. It was the most addicting thing I've ever done. Every spare moment I had was spent making them.  It was better than chocolate chip cookies and more addicting than potato chips. I had to force myself to stop and come up with a plan of action to join them. Out came the colored pencils and hexagon graph paper as I began to play with layout. What you see above was my favorite design I drew. I pushed myself even further by adding in the white flange to give more depth of the border area. This was not easy to do on such a small scale. My only negative remark from the judges was on my flange join and I already knew it. I must have done and redone that join 10 times and I just couldn't get it any smoother. I contemplated removing it entirely but I think it made the piece better even though the join was not perfect.

My Secret Garden's measurements is 10.5 inches by 11.625 inches. I didn't anticipate winning anything but really was looking forward to reading the judges comments. I was startled when I came around the corner and saw my little quilt hanging with two ribbons hanging on it that were bigger than it. It was and still is a thrill when I look at the quilt and ribbons.

I currently have several hexagon projects simultaneously going on right now. That simple shape has taken on a life of its own and it's been an amazing journey. This year I am teaching a Mystery English Paper Piecing block of the month. I've expanded the shape to include diamonds and triangles. I can hardly wait for the first class on January 31. I think no one could be more excited to share than I am. The funny thing is I am the worst and I mean the worst secret keeper. Christmas presents are nearly impossible for me to keep secret. I want to give it to the recipient as soon as I've wrapped it. I mean after all - it seems absurd to give the gift on the actual day it's supposed to be given. LOL It is killing me to not be able to share January's mystery block here right now!

To keep me from letting the cat out of the bag on my Mystery BOM, I'm sharing another of my hexagon projects.  It's called the Insanity quilt. I'm making it using Civil War fabrics. I've seen pictures of this quilt made up in lots of different fabrics but never Civil War. I'm so loving this quilt.  The hexagon size I chose for it is 5/8 inch. The designer used 1/2 inch but I wanted to grow the quilt to a size better suited for us. There will be over 10,000 hexagons in the finished quilt. 

Here's how I stay organized color wise. My goal is to not have a repeat of the diamond shapes, but since I have to make 168 of these, I may have to cave and repeat.

Here are diamond units patiently waiting their turn. Hey, did I already mention that making these are totally addicting! 


Monday, January 12, 2015

Recipe Monday - Carrot Cake

Okay, who doesn't love a good carrot cake! I've reworked this recipe to make it more friendly to those like me who are more health-conscious. Changes include no oil, better flour, egg beaters, and non-traditional sugar substitutes which I think ended up making it even better, but I also included substitutions to make it the traditional way if you prefer. Note: this reworked recipe is so moist that you can eat it without any icing (my preference), but if you have a icing-loving person in your family (I do), you can add in the icing. Picture shows full icing added which is a lot and too much in my opinion. I recommend making half the icing recipe shown below. It's plenty enough and I usually do that but forgot this time.
Carrot Cake

Preheat oven to 350 degrees.

Sift together: (note: you can substitute regular flour for the spelt and wheat flour shown below)
  • 1 cup Bob's Red Mill Spelt Flour 
  • 3/4 cup Bob's Red Mill Whole Wheat Pastry Flour
  • 1-3/4 cups Xyla Natural Sweetener -or- Whey Low Sugar Made Healthy -or- regular sugar
  • 2 tsp. baking soda
  • 1/2 tsp. salt
  • 1 tsp. cinnamon
Add:
  • 3 cups finely grated carrots (you can add a little more if you want)
Beat together thoroughly:
  • 8 oz of unsweetened applesauce (or 1 cup oil)
  • 1 cup of Egg Beaters (or 4 eggs)
Batter made with my healthier substitutions will not be as thick as most cake batters, but bakes up beautifully.
  1. Pour into a 9 x 13 inch baking dish and bake for 35 to 40 minutes (test with wooden toothpick inserted into center of cake -- will come out clean when done.) Edges may appear a little dark. Don't worry, it will not affect the taste.
Frosting: (optional) (don't forget to half the recipe below unless you want extra icing)
  • 1 8-ounce pkg of low fat cream cheese
  • 1/2 stick softened butter or margarine (Smart Balance light with flaxseed is good)
  • 3 cups of powdered sugar
  • 1/2 to 1 cup (your preference) of chopped pecans (save some halves to decorate top)
  1. Mix the cream cheese and butter or margarine together until very creamy and light. 
  2. Slowly add in the powdered sugar. Mix slowly at first to avoid a face full of powdered sugar. 
Once powdered sugar has been fully incorporated, taste icing. Is it sweet enough for your taste buds? 

If yes, add in the chopped pecans now. If you prefer it a little sweeter add in a little more powdered sugar and then taste again. I prefer it just slightly sweet so that it does not overpower the cake.

Bon Appetit!


Friday, January 9, 2015

Friday Finishes

My quilted tablecloth is finished, and it is my first 2015 finish. I'm so pleased with how it turned out. I must admit to be wonderfully surprised and thrilled at how soft became after washing. It was pretty stiff feeling before but the bamboo batting really softened after the soak to remove my markings and a run through the washer.

Vintage linen collectors or hand-quilting purists may not be pleased with my finished project and that's okay. We all must do what brings us the most joy. I hand quilted using the big stitch method with Aurifil 12 weight thread in areas that were visible. The thicker thread really stands out perfectly, which is what I was going after. I also practiced my free motion stitching and machine stitched in areas that are not visible from the front but needed more quilting to hold the quilt together and keep the batting from shifting/separating from repeated use. I'm planning on loving/using this tablecloth for many, many years. It will become a December tradition to pull it out and grace the table with it. I may just have to extend that length of use through out January because it looks so pretty on the table.

I hope that seeing this project from the beginning to the end has encouraged you to breathe new life into one of your own favorite linens or rescue one from a antique shop. They are not difficult to find.

Additional photos are included below. Click on the photo to see a larger version.

In this first photo, you can see the border area I mentioned when I first started (bottom left corner). The manufacturer stamped the cloth just a bit off which made the cream border not as wide on that one end. To fix this, I would have had to cut down the border all the way around. I decided against doing that because I wanted to keep as much of the cream border as possible. I'm so glad I did because I stitched funky trees in it, and I just love how it looks.


Monday, January 5, 2015

Recipe Monday - Kung Pao Chicken

I've decided to include a Recipe Day each week and have chosen Mondays! If you are like me and always on the lookout for new, interesting, tasty, and fairly healthy recipes, I hope to be able to add a few of my favorites to your dinner meals. I love getting creative in the kitchen so my recipes are always evolving -- don't have this for the recipe, throw in that. Sometimes the "that" ends up being even better than the 'this.'  If I find a better that, I will update the recipe here.

Cooking has always been enjoyable for me. I think it must be the 'hands thing' again. I love the process of creating food especially food from scratch. To me, cooking something from a mix from the store that you have no control over is incomprehensible because I am a process person and love the feel of the food I create as much as I love eating it. Don't worry about thinking me daft, you won't be the first or the last I promise.

I love this meal. To make it healthier, you can use brown rice. I don't overly love eating 100 percent brown rice but on occasion do half brown/half white or all white. I encourage you to make recipes your own by substituting ingredients you and your family love. For example: you can use less of all of the sauce ingredients if you prefer a more traditional, thicker sauce. For me personally, I always have to add some Sriracha Hot Chili Sauce to the top of my plate to increase the heat factor!  YUM.

Kung Pao Chicken
  • 4 Tbsp cornstarch
  • 1 14.5-ounce can cup fat-free, low-sodium chicken broth (Separate 1 cup from can and reserve remaining broth)
  • 4 Tbsp Seasoned Gourmet Rice Vinegar (can also use unseasoned if you prefer)
  • 4 Tbsp lite soy sauce
  • 1 tsp Tabasco hot pepper sauce
  • 2 tsp Splenda Brown Sugar Blend
  • 4 tsp sesame oil, divided
  • 1 tsp garlic powder (or 1 garlic clove, minced)
  • 2 or 3 halves, boneless, skinless, chicken breasts cubed
  • 1-1/2 red, yellow, or orange (or combination thereof) bell peppers cubed
  • 1 cup sliced thinly carrots
  • 1 8-ounce can water chestnuts, rinsed, drained, and sliced (think slivered almonds look)
  • 1 cup peanuts
  • 2 cups brown or white rice, cooked

  1. In a small bowl, combine cornstarch and 1 cup of chicken broth and whisk until cornstarch dissolves.  Add vinegar, soy sauce, hot pepper sauce, Splenda Brown Sugar Blend, 2 tsp sesame oil, and garlic; stir well and set aside.
  2. In a large nonstick skillet or wok, heat cooking spray and 1 tsp sesame oil over medium-high heat. Add cubed chicken breast and cook until done (4 to 6 minutes). Remove chicken from pan and set aside.
  3. Add remaining tsp of sesame oil and add in peppers and carrots and stir-fry for 1 minute; add in water chestnuts and peanuts to pan and stir-fry for 4 minutes.  Add chicken broth mixture to skillet and bring to a boil.  Add chicken back to skillet.  As mixture thickens, slowly add reserved chicken broth to skillet a little at a time until reserved broth has been incorporated into mixture.  Simmer 3 to 5 minutes.
  4. Serve over brown or white rice.
Bon Appetit!